
Information
On June 1st 2015, qualifying
Windows 7 and
Windows 8.1 PCs and tablets will start seeing the
Get Windows 10 icon in their taskbar notification area to be able to
reserve your free upgrade to Windows 10 today for when released on
July 29th 2015.
PCs that Microsoft determines cannot run Windows 10 will not see the Get Windows 10 app before July 29, 2015. After July 29, 2015, Microsoft will enable the icon in the system tray. This is to help ensure that you can easily check your PC’s compatibility if you choose.
For more details, see: Windows 10 Q&AThe
KB3035583 Windows Update is responsible for adding the
Get Windows 10 app to Windows 7 SP1 and Windows 8.1 PCs and tablets with IE11. Originally the KB3035583 update was optional to install. Microsoft has now changed KB3035583 to be important (recommended), which will have KB3035583 download and install automatically.
This tutorial will show you how to hide or remove the
'Get Windows 10' (GWX) icon on the taskbar in
Windows 7 and
Windows 8.1 if you do not wish to reserve your free upgrade to Windows 10 when released.

Tip

Warning
Microsoft will only offer the free upgrade to Windows 10 for qualifying Windows 7 and Windows 8.1 PCs and tablets until the end of
July 2016.
After this date, you will have to pay for Windows 10 if you did not take advantage of the
Upgrade to Windows 10 update in Windows Update or
reserve your free upgrade offer using Get Windows 10.
CONTENTS:
- Option one: To Hide 'Get Windows 10' Notification Area Icon
- Option Two: To Hide or Show 'Get Windows 10' Notification Area Icon using Task Scheduler
- Option Three: (recommended) To Disable 'Get Windows 10' using a REG file
- Option Four: To Remove 'Get Windows 10' by Uninstalling KB3035583 Update
EXAMPLE: Get Windows 10 icon on taskbar EXAMPLE: Get Windows 10 app
 EXAMPLE: Windows 10 upgrade reminder

OPTION onE

To Hide 'Get Windows 10' Notification Area Icon

Note
This option will show you how to hide or show the Get Windows 10 icon on the taskbar notification area for only your user account.
This way the Get Windows 10 app is not removed from the PC, and you will be able to use it when you like in the future.
Warning
Hiding the Get Window 10 app icon on the taskbar notification area is only temporary.
If you log out and in or restart the computer, it will show again.
1. Open your
Notification Area Icons settings.
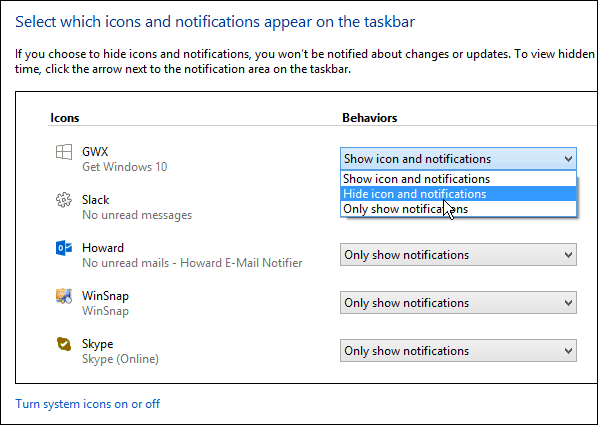
2. Uncheck the
Always show all icons and notifications on the taskbar box.
3. Set the
GWX Get Windows 10 icon to
Hide icon and notifications, and click/tap on
OK.

OPTION TWO
To Hide or Show 'Get Windows 10' Notification Area Icon using Task Scheduler
Note
You must be logged in as an administrator to be able to do this option.
This option will show you how to hide or show the Get Windows 10 icon on the taskbar notification area for all users on the PC.
This way the Get Windows 10 app is not removed from the PC, and you will be able to use it when you like in the future.
1. Press the
Windows+R keys to open the Run command, type
taskschd.msc, and click/tap on
OK to open Task Scheduler.
2. In the left pane of Task Scheduler, expand open and navigate to the
gwx folder below. (see screenshots below)
 Task Scheduler Library/Microsoft/Windows/Setup/gwx
 Do
step 4 (show) or
step 5 (hide) below for what you would like to do.
4. To Show Get Windows 10 icon on Taskbar Notification Area
NOTE: This is the default setting.
A) In the middle pane of
gwx, right click on the
launchtrayprocess task, and click/tap on
Enable. (see screenshot below)
B) In the middle pane of
gwx, right click on the
refreshgwxconfig task, and click/tap on
Enable. (see screenshot below)
C) In the middle pane of
gwx, right click on the
launchtrayprocess task, and click/tap on
Run. (see screenshot below)

5. To Hide Get Windows 10 icon on Taskbar Notification Area
A) In the middle pane of
gwx, right click on the
launchtrayprocess task, and click/tap on
Disable. (see screenshot below)
B) In the middle pane of
gwx, right click on the
refreshgwxconfig task, and click/tap on
Disable. (see screenshot below)

When finished, close Task Scheduler.
7. Log off and on to Windows, or
restart the computer to apply.
OPTION THREE
To Disable 'Get Windows 10' using a REG file
Note
You must be logged in as an
administrator to be able to do this option.
This option will show you how to enable or disable to show the
Get Windows 10 icon on the taskbar notification area and the
Windows 10 upgrade reminder for all users on the PC.
This way the
Get Windows 10 app is not removed from the PC when disabled, and you will be able enable it again to use it when you like in the future.
The .reg files below will add and change the DWORD values in the registry keys below.
(GWX icon)
HKEY_LOCAL_MACHINE\SOFTWARE\Policies\Microsoft\Windows\GWX
DisableGWX DWORD
0 or delete = enable
1 = disable
1. Do
step 2 (enable) or
step 3 (disable) below for what you would like to do.
2. To Enable Get Windows 10
NOTE: This is the default setting.
A) Click/tap on the Download button below to download the file below, and go to
step 4 below.
Enable_Get_Windows_10.reg
3. To Disable Get Windows 10
A) Click/tap on the Download button below to download the file below, and go to
step 4 below.
Disable_Get_Windows_10.reg Save the .reg file to your desktop.
5. Double click/tap on the downloaded .reg file to merge it.
6. If prompted, click/tap on
Run,
Yes (UAC),
Yes, and
OK to approve the merge.
7. Restart the computer to apply.
8. If you like, you can delete the downloaded .reg file if you like.
OPTION FOUR
To Remove 'Get Windows 10' by Uninstalling KB3035583 Update
Note
That's it,
Shawn

Microsoft is generously offering users of Windows 7 and up a free upgrade to Windows 10. Great, but do you need to annoy us about it in our system tray? on every computer, we own or have access to? If you’d like to prevent dinnertime discussions about Windows 10, here’s all the ways to disable the annoying upgrade notification.
Uninstall Update for Windows KB3035583
Thank you Microsoft for including ads along with this update. I kid. We already mentioned how to uninstall the update in our Windows 10 overview. And if you want to avoid Windows installing this update again, you’ll want to hide the update. Go to Windows Update and click on Important. Then right click on the KB3035583 and then Hide Update. Keep in mind though that Microsoft could be sneaky and include the notification with other updates. Microsoft really wants you to try Windows 10, and get as many people to upgrade as possible, so expect the company to continue to push it hard. Update: The I Don’t Want Windows 10 app does this for you.

Disable the Windows 10 Notification
The GWX – Get Windows 10 process is just like any process in the Taskbar system tray. You can customize the notifications for this app without disabling it. We’ve covered modifying notifications before.
Just right click near the time/date in the Taskbar system tray and pick Customize Notification icons. Then look for the GWX entry and change it to Hide icon and notifications. Update: Microsoft won’t take no for an answer and this notification reappears. You may have to disable it in Task Scheduler. Go to Library\Microsoft\Windows\Setup\gwx and disable gwxlaunchtryprocess and refreshgwxconfig.
Temporarily Stop the Process
If you want to make your reservation, but just not now, you can kill the process. Bring up the Task Manager using your preferred method (I right click on the Taskbar) and then end the GWX.exe process. It will start again once you reboot the computer, but there’s a way to fix that.

Delete the GWX Program
You’ll need to end the GWX process first, but then you can delete just the program. It’s located in C:\Windows\System32\GWX and C:\Windows\SysWOW64\GWX in 64 bit systems. Delete the entire GWX folder.

There’s no promise another update won’t reinstall this helpful(?) program, though. The notification seems the best way to tell Microsoft “thanks but no thanks.” (at least at this time).
Updated with software tools and additional steps.