NeoSmart Knowledgebase
Fix the MBR – Guide for Windows XP, Vista, 7, 8, 8.1
This guide shows you how to fix the Master boot record (MBR) in any of the Windows versions: Windows XP, Vista, 7, 8 or 8.1
Contents [hide]
What is MBR
The MBR (stands for “Master boot record”) is a boot sector (a region of your hard disk) that holds information about the partitions of your hard drive and acts as a loader for the operating system you’re running.
The Master boot record is created when you first install Windows, on the first partition you create. It’s the first 512 bytes of your hard disk.
If the MBR is damaged, you won’t be able to boot into Windows. All Windows versions – Windows XP, Vista, 7 or 8 – use MBR and, if damaged you won’t be able to boot.
It can be damaged by certain viruses that target the MBR to replace it with their own code or in cases when you dual boot with a Linux distribution (see Error: no such partition. Grub rescue article).
Backup
You can backup the MBR since it’s stored on the hard disk and you restore it later, when needed.
You only need one command to backup the MBR:
dd if=/dev/sda of=/path-to-save/mbr-backup bs=512 count=1
In the above command, /path-to-save/mbr-backup is the path where you want to save mbr-backup.
Restore
Important: Restoring your Master boot record with the wrong partition table will make your data unreadable and will make it very hard to recover your data later.
You can restore the saved Master boot record using this command:
dd if=/path-to-get/mbr-backup of=/dev/sda bs=512 count=1
In this command, /path-to-get/mbr-backup is the path where you have the mbr-backup stored.
Common errors
If the Master boot record is broken, your computer may show some of the following errors:
- Error loading operating system (see our Error loading operating system: Fix for Windows XP, Vista, 7 guide)

- Operating System missing (see our Operating System not found or missing: Fix for Windows XP, Vista, 7, 8 guide)

- Invalid partition table

- Reboot and select proper boot device
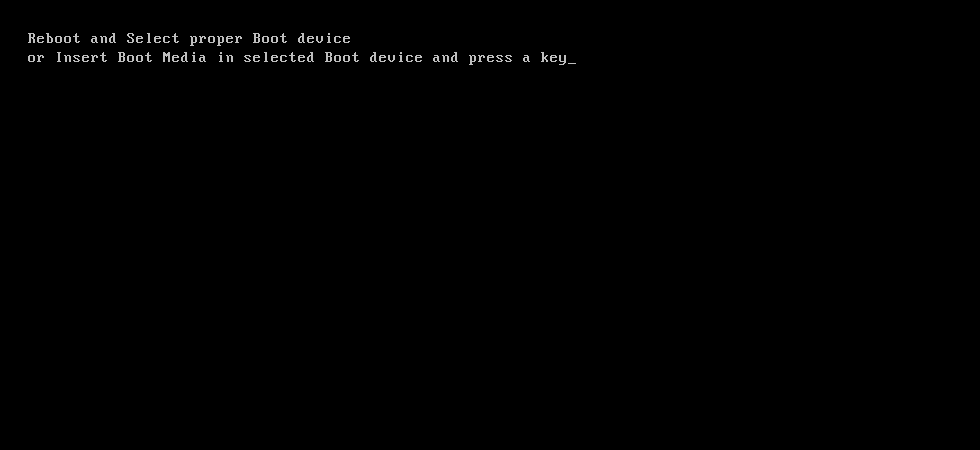
The message is:
Reboot and Select proper Boot device
or Insert Boot Media in selected Boot device and press a key_
Other errors can be shown, depending on many factors, that are caused by a damaged boot record.
Fix the MBR with Easy Recovery Essentials
Easy Recovery Essentials, our recovery and repair disk, can repair most damages done to the Master boot record (MBR) using its Automated Repair feature for Windows XP, Vista, 7 or 8:
- Download Easy Recovery Essentials. Choose your Windows version (XP, Vista, 7 or 8) before downloading.
- Burn the image. Follow these instructions on how to burn the bootable ISO image very carefully, as making a bootable CD can be tricky!
- Boot Easy Recovery Essentials
- Choose Automated Repair option and click Continue

- Choose your Windows installation drive’s letter (usually it’s
C:\) and click on Automated Repair - Easy Recovery Essentials will now begin
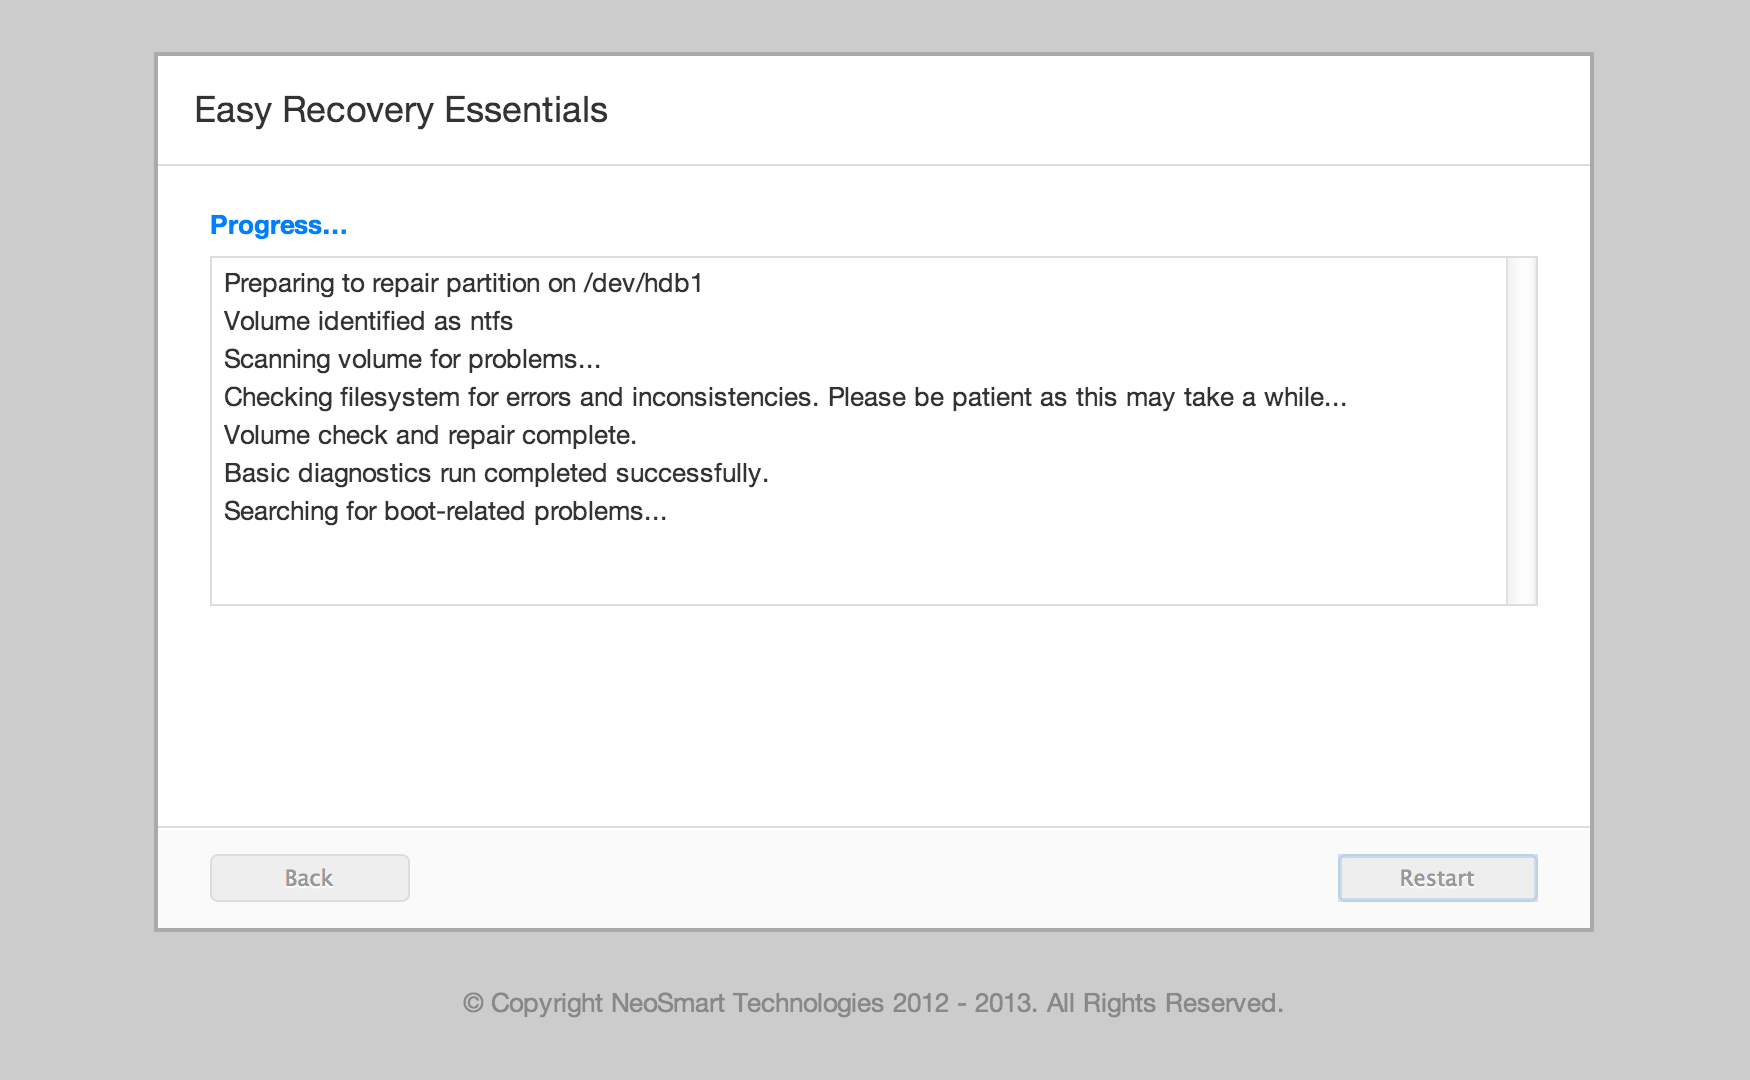
- Once the process is complete, click Restart
- Done. Windows XP, Windows Vista, Windows 7 or Windows 8 should properly load now.

You can download Easy Recovery Essentials from here.
Fix the MBR in Windows XP
Windows XP users can use the fixmbr command to repair the MBR. You need the original Windows XP installation CD to run Recovery Console and run the fixmbr utility.
If you don’t have the Windows XP installation CD to run Recovery Console, go to Fix MBR with Easy Recovery Essentials.
The fixmbr command is only available for Windows XP and Windows 2000.
The instructions to run fixmbr are:
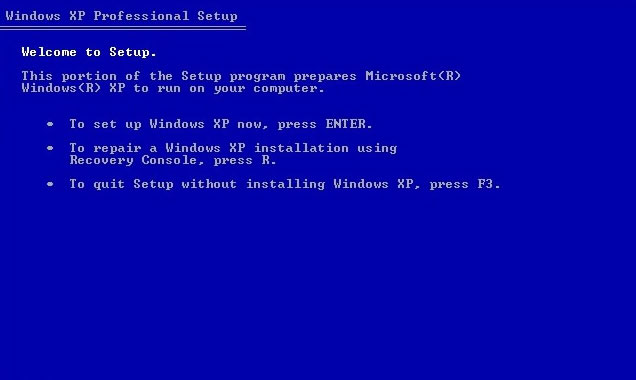
- Boot from the Windows XP CD
- At the “Press any key to boot from CD…” message, press any key to boot into the CD
- When the Welcome to Setup screen appears, press R to open Recovery Console
- At the “Which Windows installation would you like to log onto” question, type
1and hit Enter, if your Windows XP is the only operating system on your hard drive - At the “Type the Administrator password” question, enter the password and hit Enter afterwards
- Type
fixmbr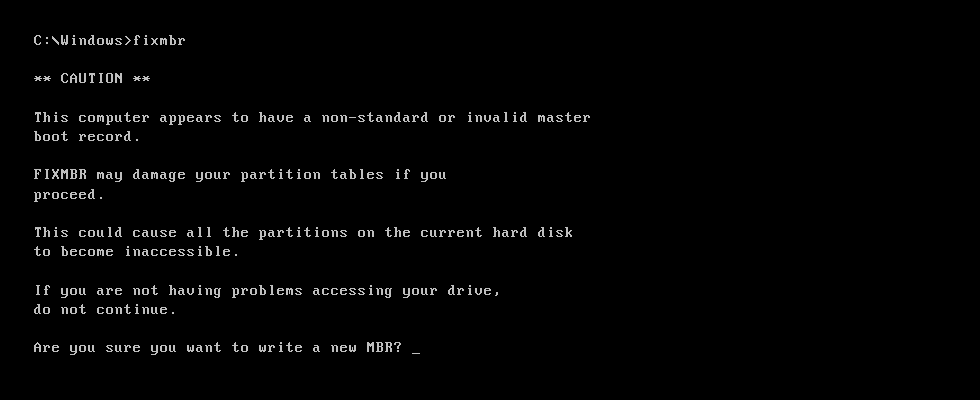
If the “Are you sure you want to write a new MBR?” message appears, press Y and hit Enter
- Press Enter
- Wait for the process to finish. The fixmbr utility software will repair any damage to the master boot record.
- Remove the Windows XP CD
- Type
exit - Press Enter to restart your computer
If you weren’t able to boot your computer because of a damaged MBR, the above instructions should fix it and your Windows XP should start normally.
If the fixmbr command doesn’t work, try using the map command to get the correct drive name where you want to repair the Master boot record:
- Type
map - Hit Enter
- Wait for the output of the map utility:
C: NTFS 1024MB \Device\Harddisk0\Partition1
E: \Device\CdRom0
The above output is an example. The output for your computer can be different, but note the drive letter for the item with
Harddisk0, in this caseC:\.
Fix the MBR in Windows Vista
Windows Vista uses a different utility to fix the MBR than XP does, the bootrec command.
You need your original Windows Vista installation CD/DVD to run the bootrec utility.
If you don’t have the Windows Vista installation CD/DVD to run Command Prompt, go to Fix MBR with Easy Recovery Essentials.
The instructions are:
- Boot from your Windows Vista installation CD or DVD
- Choose your language and keyboard layout
- At the Welcome screen, click on Repair your computer

- Choose the operating system and click Next
- When the System Recovery Options window appears, click on Command Prompt
- When Command Prompt appears, type these commands:
bootrec /FixMbr
bootrec /FixBoot
bootrec /RebuildBcd
You can type
bootrec.exefor a full description of above commands. - Press Enter after each command
- Wait for the operation to finish. If it was a success, a confirmation message will appear on the screen.
- Remove the CD/DVD from the disk tray
- Type
exit - Hit Enter and restart your computer
You can run Startup Repair for Windows Vista before running bootrec.exe to try and fix the boot error automatically. The steps to run Startup Repair are:
- Boot from the installation CD/DVD
- Click on Repair your computer, after you select the language and keyboard layout
- Choose your operating system from the list, click Next
- When the System Recovery Options dialog appears, click on Startup Repair

- Wait for the process to finish. Restart your computer when prompted by the system
Another alternative is to completely rebuild the BCD, if the bootrec /rebuildbcd command doesn’t work. When you are at the Command Prompt, type the following commands:
bcdedit /export C:\bcdbackup
c:
cd boot
attrib bcd -s -h -r
ren c:\boot\bcd bcd.backup
bootrec /rebuildbcd
After each command, hit Enter.
Fix the MBR in Windows 7
You need your original Windows 7 installation DVD to boot into System Recovery Options and run Command Prompt.
If you don’t have the Windows 7 installation CD/DVD to run Command Prompt, go to Fix MBR with Easy Recovery Essentials.
The instructions are:
- Boot from the Windows 7 installation DVD
- At the “Press any key to boot from CD or DVD…”, press any key to boot from the DVD
- Select a language
- Select a keyboard layout
- Click Next
- Select the operating system and click Next. The “Use recovery tools that can help fix problems starting Windows” must be checked when you select the operating system.
- At the System Recovery Options screen, click on Command Prompt

- When Command Prompt successfully loads, type this command:
bootrec /rebuildbcd
- Press Enter
- Type the next command:
bootrec /fixmbr
- Press Enter
- Type the next command:
bootrec /fixboot
- Press Enter
- Remove the installation DVD from the disk tray and restart your computer
If bootrec /fixmbr and bootrec /fixboot doesn’t work, try restoring the boot sector code of your Windows 7:
- Determine the drive letter of your Windows installation CD/DVD by typing these commands in the Command Prompt:
diskpart
select disk 0
list volume
- Look for the “CD-ROM” word in a “Type” column. This item is your CD/DVD installation drive letter.
If the drive letter isD:\, type these commands:exit D: cd boot dir
If the drive letter is different than D:\, replace the second command with the drive letter you have noted from the previous list volume command.
- Type this command:
bootsect /nt60 SYS /mbr
- Press Enter
- Remove the CD/DVD from the disk tray
- Type
exit - Press Enter to restart your computer
Fix the MBR in Windows 8 or 8.1
You need the original Windows 8 or 8.1 installation DVD to repair the Master boot record.
If you don’t have the Windows 8/8.1 installation CD/DVD to run Command Prompt, go to Fix MBR with Easy Recovery Essentials.
The instructions are:
- Boot from the original installation DVD (or the recovery USB)
- At the Welcome screen, click Repair your computer

- Choose Troubleshoot
- Choose Command Prompt
- When the Command Prompt loads, type the following commands:
bootrec /FixMbr
bootrec /FixBoot
bootrec /ScanOs
bootrec /RebuildBcd
- Press Enter after each command and wait for each operation to finish
- Remove the DVD from the disk tray
- Type
exit - Hit Enter
- Restart your computer and check if Windows 8/8.1 can now boot
If bootrec utility doesn’t fix your Windows 8/8.1, try following the next commands to fix the EFI bootloader of the Windows 8/8.1:
- Boot from the installation DVD or the Windows 8 or Windows 8.1 recovery USB
- Click Repair your computer
- Choose Troubleshoot
- Choose Command Prompt
- Type these commands in order and hit Enter after each:
diskpart
sel disk 0
list vol
These commands will select the first disk of your computer and the list all the partitions available on that disk.
- Check for the volume item that has the Fs column FAT32. The EFI partition must be formatted under FAT32.
If the volume number of EFI partition is “2”, type the following command:sel vol 2
If the volume number is different than 2, replace “2” with the number available on your computer.
- Assign a letter to this partition, a letter that is different that those already available on your computer, for example
x:\. Type this command to assign the letter:assign letter=x:
- Wait for the success message to appear:
DiskPart successfully assigned the drive letter or mount point.
- Type
exitto quit the DiskPart utility:exit
- Type this command and replace x:\ with the letter you assigned earlier to the EFI partition:
cd /d x:\EFI\Microsoft\Boot\
- Then type the bootrec command to repair the volume:
bootrec /fixboot
- Now you need to backup the old BCD and recreate a new one. Type:
ren BCD BCD.backup
- Type this command to recreate the BCD and replace the x:\ with the assigned letter earlier:
bcdboot c:\Windows /l en-us /s x: /f ALL
- In above command, Windows is installed on
c:\. If the drive letter where your Windows 8/8.1 is installed is different, replace c:\ with your drive letter. - Remove the DVD from the disk tray
- Type
exit - Restart your computer
More Information
Support Links
- Easy Recovery Essentials for Windows – our repair and recovery disk.
It’s an easy-to-use and automated diagnostics disk. It’s available for Windows 8, Windows 7 and Windows Vista. It’s also available for Windows XP and Windows Server.Read more at Windows Recovery Disks.
- The NeoSmart Support Forums, member-to-member technical support and troubleshooting.
- Get a discounted price on replacement setup and installation discs: Windows XP, Windows Vista, Windows 7, Windows 8.
Applicable Systems
This Windows-related knowledgebase article applies to the following operating systems:
- Windows XP (all editions)
- Windows Vista (all editions)
- Windows 7 (all editions)
- Windows 8 (all editions)
- Windows 8.1 (all editions)
'컴퓨터관련' 카테고리의 다른 글
| 윈도우8 제품키변경...펌 (0) | 2014.11.24 |
|---|---|
| 윈도우8 전화인증 번호이용 포맷후 재인증...펌 (0) | 2014.11.24 |
| 공유기 바꾼후 네트워크2 이름 생긴거 네트워크로 바꾸기...펌 (0) | 2014.10.23 |
| sky tv 드라이버 인식 오류 해결법...펌 (0) | 2014.09.23 |
| 넷북 xp 해상도 높이는 유틸...펌 (0) | 2014.08.17 |