 Published by | |
How to Change the Default Location of a User Profile in Vista and Windows 7
 Information A user profile is the main C:\Users\(user-name) folder of a user account that contains all of the account's settings, shortcuts, information, and user folders (ex: My Music) with the files in them.
This will show you how to Move the default location of a user profile in Windows 7 and Vista to another location of your choice so it will be stored and used from the new location instead.
This can be handy if you are low on free space on your C: drive.
You must be logged in as an administrator to be able to do the steps in this tutorial.
 Warning Before doing this, you should create a system image to be safe. This way you can do a system image recovery to undo any mistake you might make in the instructions below that could result in the user profile you are moving, or Windows, to no longer work.  Note The drive or partition that you move the user profile folder(s) to, will now be included in a system image if created since it will now be considered a system drive.  Tip If you are just wanting to save HDD space from the files in your user folders, then you might consider this below to be able to access the files from your libraries with the files actually located where you like instead. This way you will not have to worry about any potential issues that come with moving user folder locations.
 OPTION onE  For Already Existing User Accounts
 Warning Some of the programs you have installed may not work properly after moving your user profile folder since they are still looking for their information in the user profile folder's original AppData folder location which of course no longer exists.
If you have this problem afterwards, then you may be able to uninstall and reinstall these programs, or use OPTION TWO in the tutorial to create a new user account and create new shortcuts for the programs to fix this.
 Method one  1. Log on to the user account that you want to move. In Windows Explorer, navigate to it's C:\Users\(user-name) folder, right click on the user folder, click on Share with and Nobody.
2. Log off.
3. Log on to an administrator account that you are not moving it's user folder for.
NOTE: If you do not have another administrator account to use, then you will need to create a new account first and log in to it. When done with the tutorial, you can delete the new account.
4. In Windows Explorer, navigate to the C:\Users\(user-name) folder (ex: C:\Users\User account to move) that you want to move. Right click on it and click on Copy. (see screenshot below)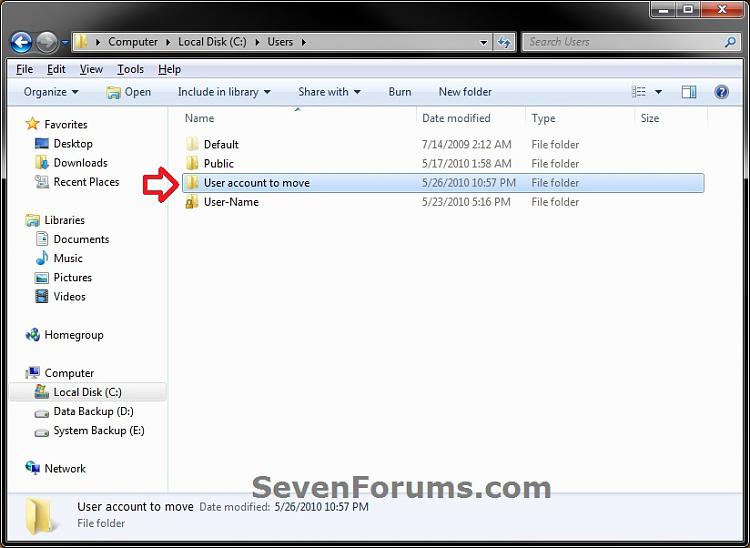
5. In Windows Explorer, navigate to the new location (ex: E: drive) that you want to move the C:\Users\(user-name) folder to. Right click on a empty space in the main window (middle), and click on Paste. (see screenshot below)
NOTE: This should be another internal hard drive or partition.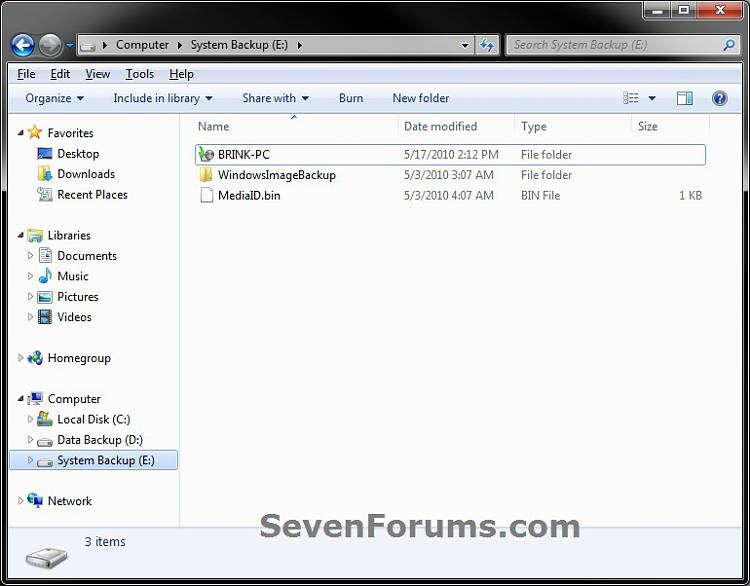
6. If prompted, click on Continue. (see screenshot below)
7. If prompted by UAC, then click on Yes (Windows 7) or Continue (Vista).
8. The C:\Users\(user-name) folder (step 4) is now copied over to the new location (ex: E:\User account to move). You can close Windows Explorer. (see screenshot below)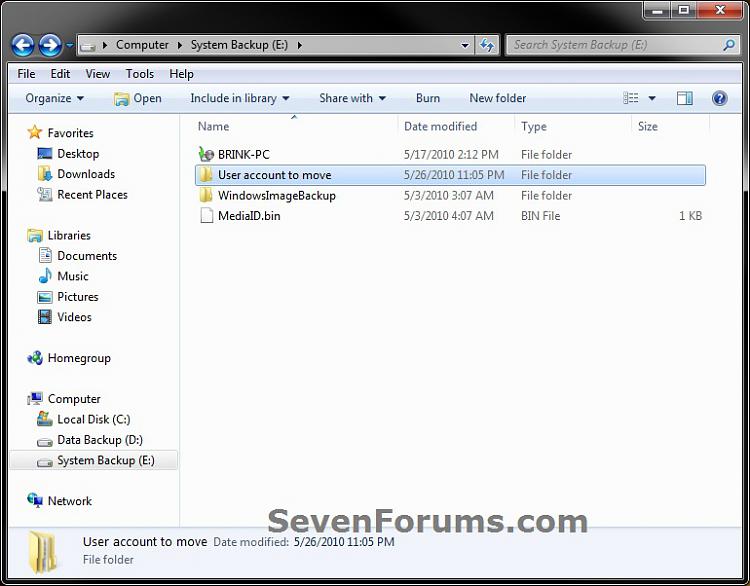
9. Open the Start Menu, then type regedit in the search box and press enter.
10. If prompted by UAC, then click on Yes (Windows 7) or Continue (Vista).
11. In regedit, navigate to the location below. (see screenshot below)
Code: HKEY_LOCAL_MACHINE\SOFTWARE\Microsoft\Windows NT\CurrentVersion\ProfileList 
12. In the left pane under the Profilelist key, select and look at each S-1-5 key with the long number until you see the user account name and path (step 3) that you want to move in the value Data column of ProfileImagePath in the right pane. When the correct user name is found, right click on ProfileImagePath, and click on Modify. (see screenshot above)
13. Type in the full path of the location (ex: E:\User account to move) that you copied the user profile folder to in step 7, and click on OK. (see screenshot below)
14. Regedit will now look similiar to this with the new location now. Close regedit. (see screenshot below)
15. To Verify that the User Profile has been Moved SuccessfullyA) Log off or Switch User, then log in to the user account that you moved the user profile folder of.
B) Open the Start Menu and open the user profile folder from this location. (see screenshot below)
C) Right click on one of the user folders (ex: Desktop), click on Properties, and click on the Location tab. (see screenshot below)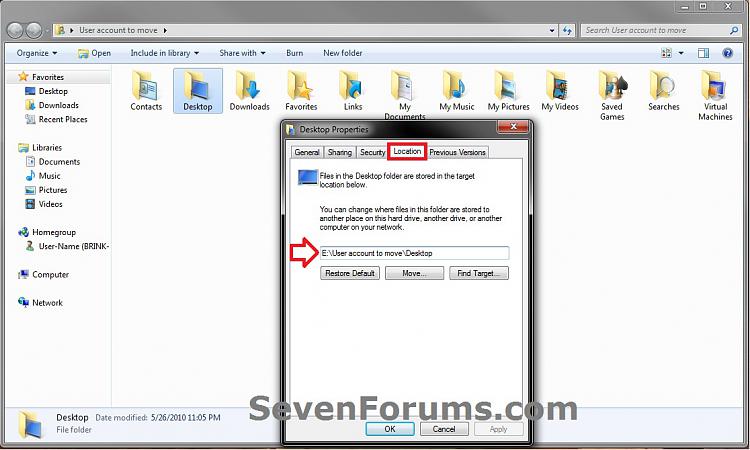
D) You should see the new location (ex: E:\User account to move\Desktop) from step 8 as the now new default location. Click on OK. (see screenshot above)
16. To Delete the User Profile from the Old Location
NOTE: Once you have verified (step 15) that the moved user profile has been moved successfully, you can now safely delete the user profile folder from the old location (ex: C:\Users\User account to move) from step 4.A) Log off of the user account that you moved if you are logged into it from step 15.
B) Log on to an administrator account that you did not move it's user folder for.
C) In Windows Explorer, navigate to the old C:\Users\(user-name) folder (ex: C:\Users\User account to move) that you had copied (step 4). Right click on it and click on Delete. (see screenshot below)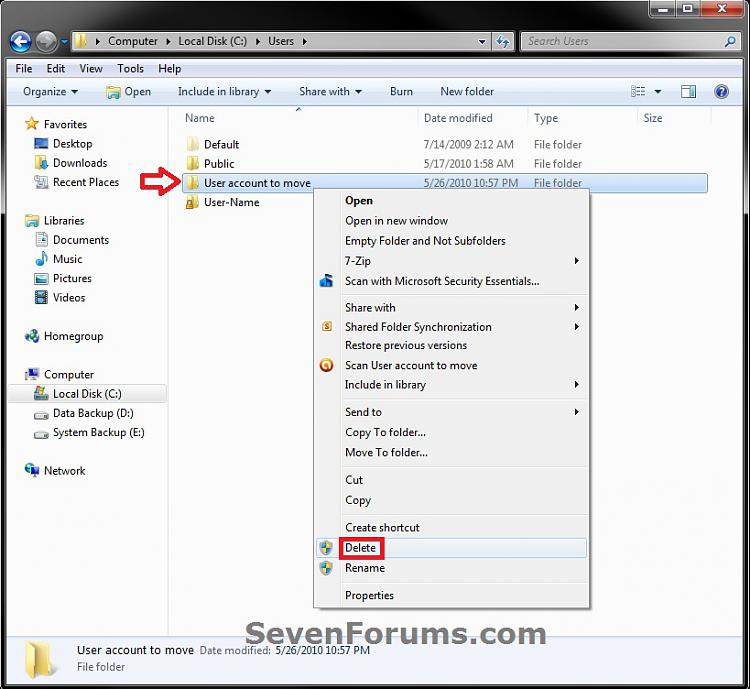
D) If prompted by UAC, then click on Yes (Windows 7) or Continue (Vista).
E) If prompted, click on Continue. (see screenshot below)
F) You can now empty the Recycle Bin to finish deleting the old user profile folder from the old location.
NOTE: You will need to approve emptying the Recycle Bin.
17. The existing user profile folder has now been completely moved to the new default location where Windows 7 or Vista will now run it from when logged on to it.
 Method Two  1. Repeat OPTION onE, but move the new default User Profile folder (ex: E:\User account to move) and registry entries back to the original C:\Users folder location (ex: C:\Users\User account to move).
 OPTION TWO  For All New User Accounts Created
 Note This will change where all newly created user accounts will have their user profile folder created at in a default location of your choice instead of the old default C:\Users location. Thank you to Alain for pointing this out. 1. To Change the Default User Profile Location of New User AccountsA) Open the Start Menu, then type regedit in the search box and press enter.
B) If prompted by UAC, then click on Yes (Windows 7) or Continue (Vista).
C) In regedit, navigate to the location below. (see screenshot below)
Code: HKEY_LOCAL_MACHINE\SOFTWARE\Microsoft\Windows NT\CurrentVersion\ProfileList 
D) In the right pane of ProfileList, right click on ProfilesDirectory and click on Modify. (see screenshot above)
E) Type in the full path (ex: E:\Users) of where you want new user accounts to be created at, and click on OK. (see screenshot below)
F) The registry will now look similar to this. (see screenshot below)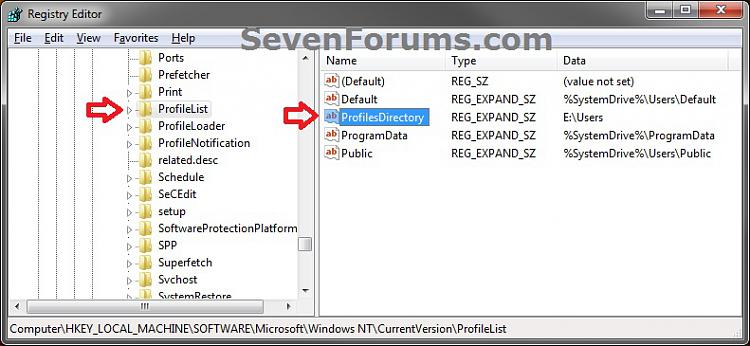
G) When you create a new user account, it's user profile folder will now be created at the location you specified in step 1E.
2. To Restore the Default User Profile Location of New User AccountsA) Repeat step 1, but type %SystemDrive%\Users at step 1E instead.
NOTE: This step only changes the user profile folder location of any newly created user accounts back to this default location, and not any existing user accounts.
B) If you wish to change an already existing new account's user profile folder location, then you will need to do Method Two in OPTION onE above to change it back to C:\Users.
3. Close regedit.
That's it,
Shawn
|
|


